Thirfty Thursday’s – Sleeveless Tuxedo Dress DIY

This week, I got a little creative and crafty!  As you may recall, my friend Natasha from Baby T’s Fashion Diaries and I have joined forces for a two-part thrifting series.  Last week’s post was a huge success and many of you have mentioned that you were inspired to go thrift shopping as well!  I’m so glad that the post was inspiring.  Hopefully today’s will be as well. 🙂

This week, Natasha and I decided to take a thifted item and ‘repurpose’ it.  Make it work, as Tim Gunn from Project Runway would say.  So we did!  Take a look at what we did below:

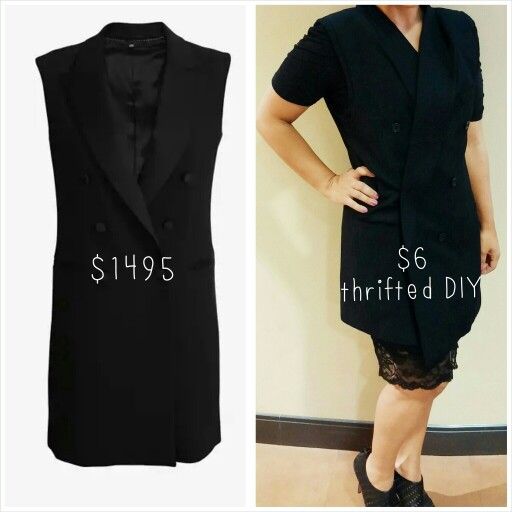
Part 1:  The Inspiration – I’ve really wanted a sleeveless tuxedo dress for a while now. When I saw this Neil Barrett Tuxedo dress on Intermix.com for $1495 I knew I had to find a more affordable version of this dress.  So, when Natasha and I agreed to write this blog post together, I knew exactly what item I was going to repurpose!

Screen Shot 2014-08-21 at 9.41.54 AM

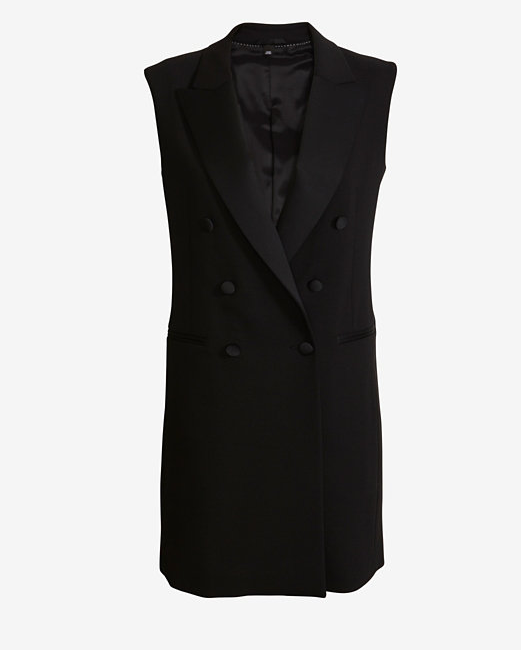
                    Neil Barrett Tuxedo Dress, $1495 (Intermix.com)

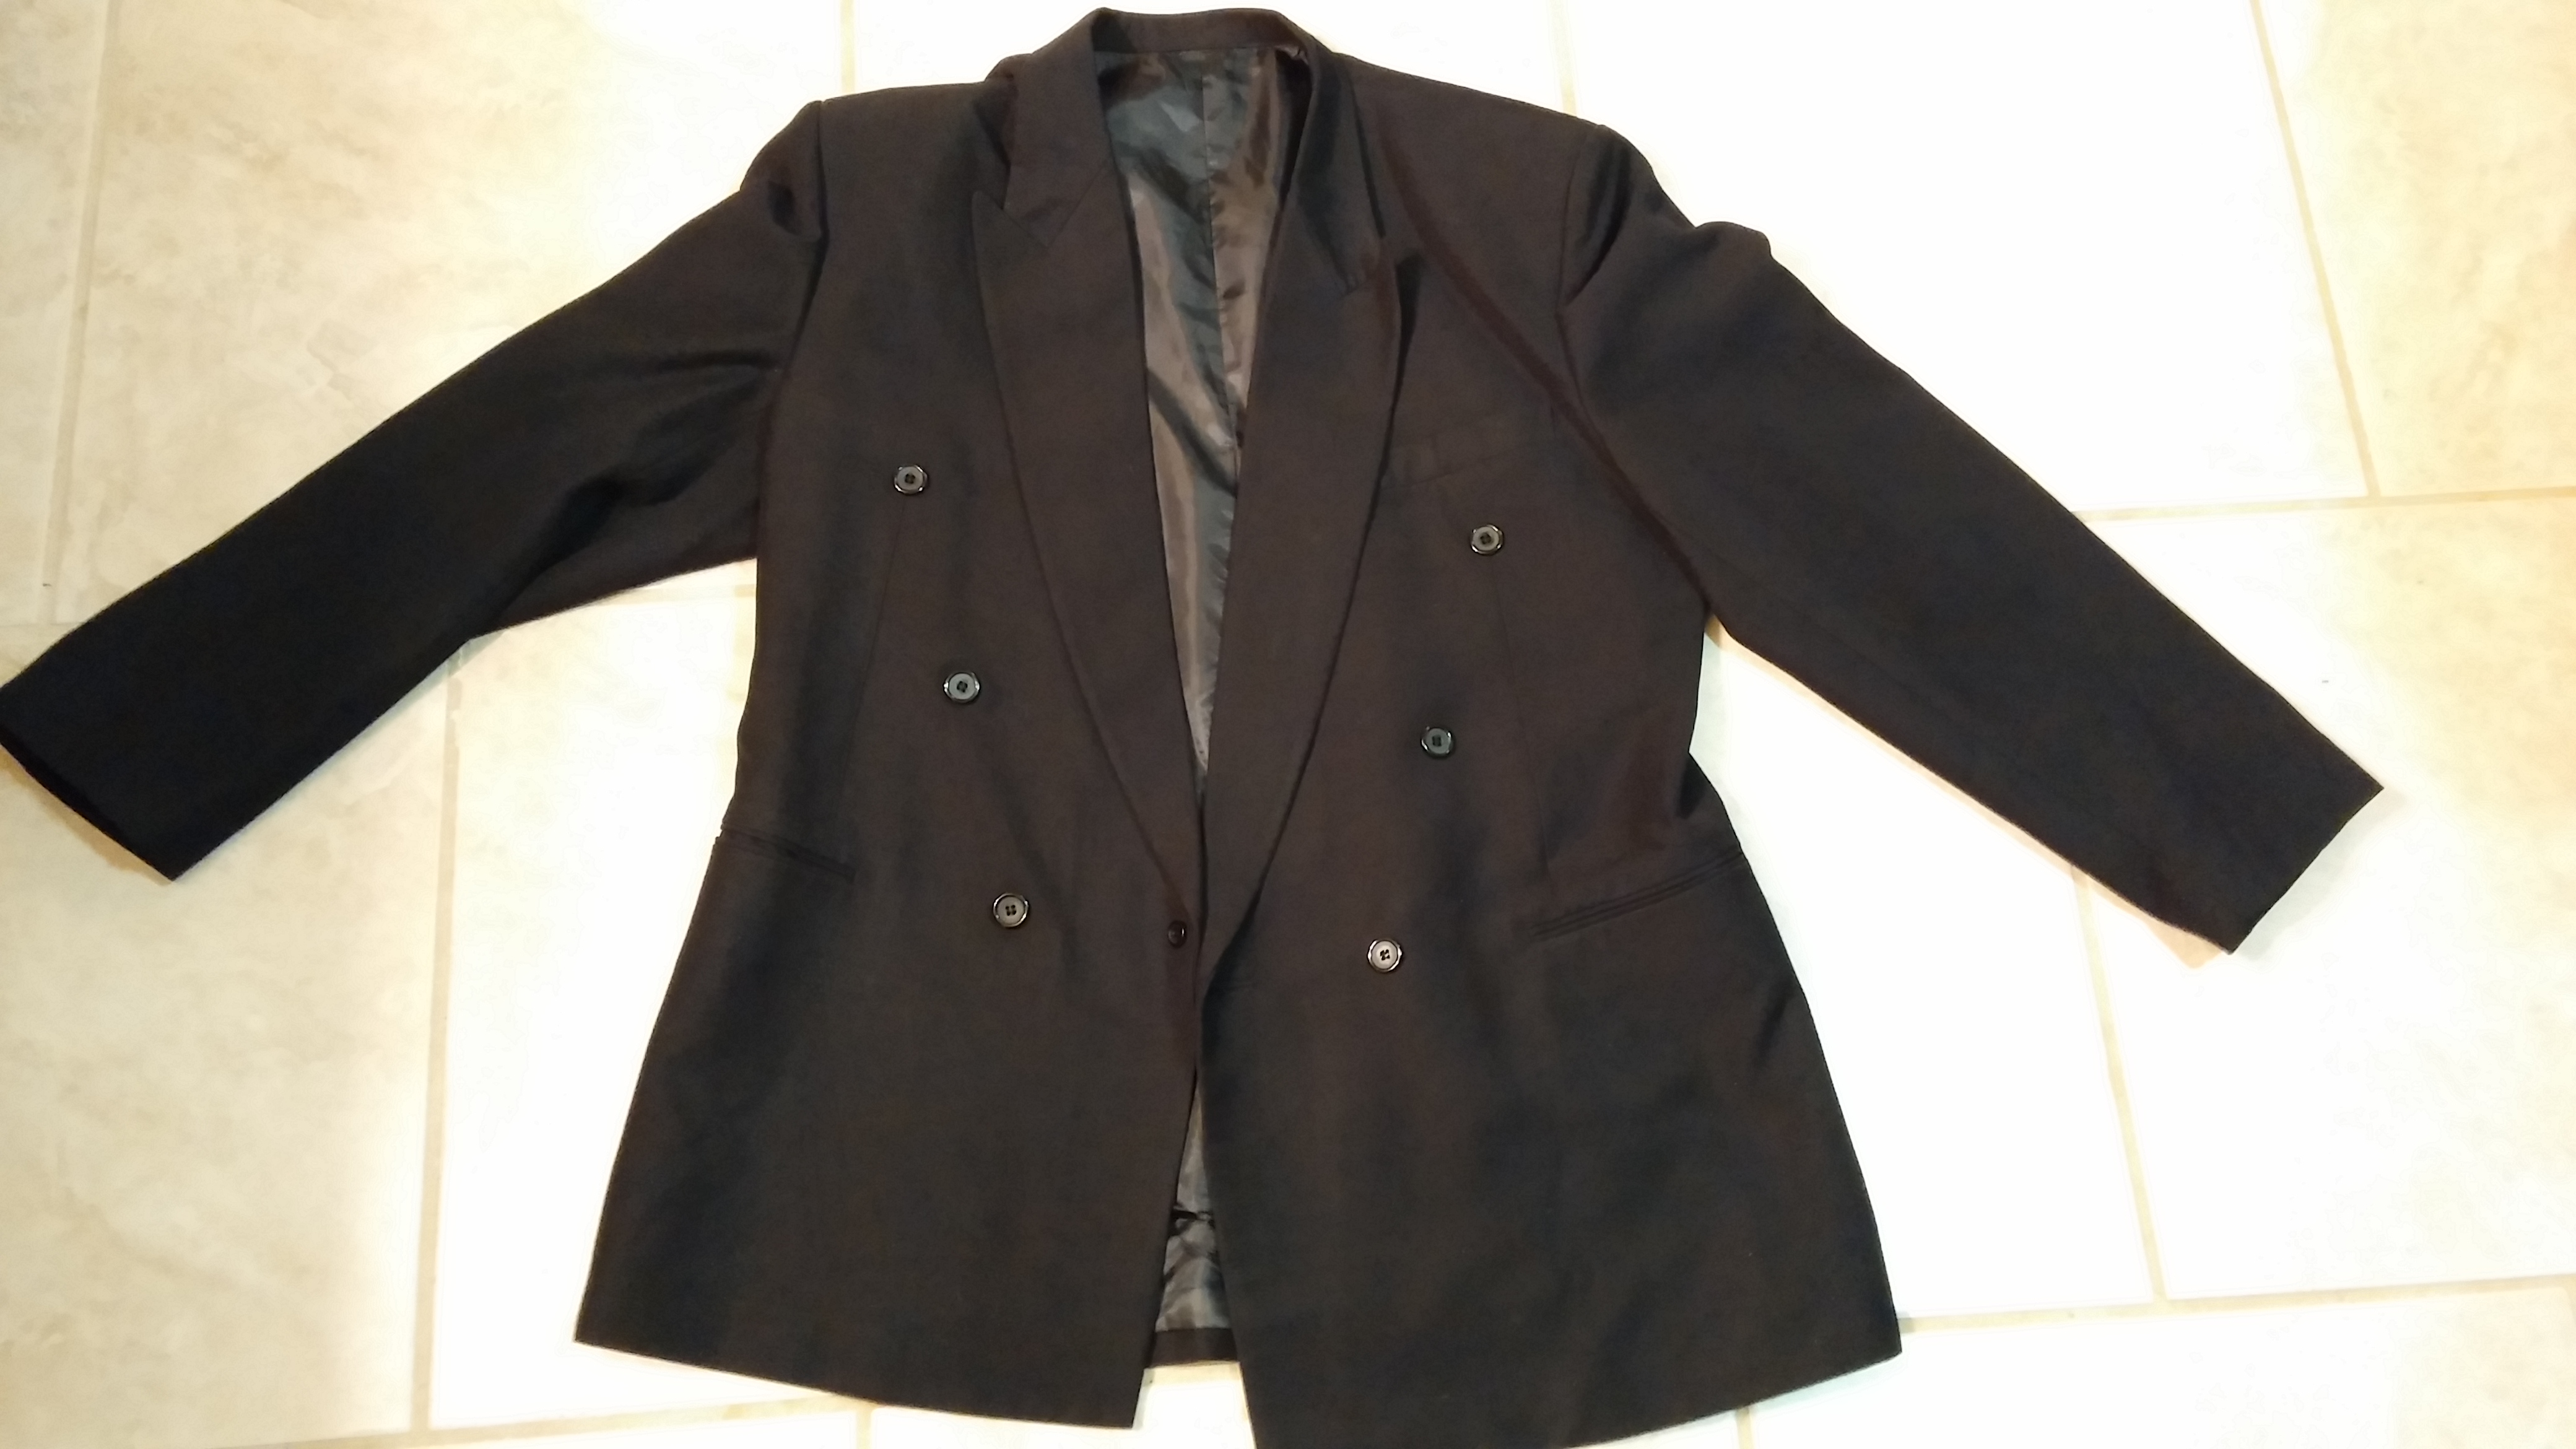
Part 2: The Thrifted Item – A men’s tuxedo style blazer/jacket.  I went straight to the men’s section of the thrift store (after all, I really only had a few minutes to shop with 2 kids in tow), and picked one that would be long enough to wear as a dress and didn’t have any holes or stains, etc.  Ten minutes and $6 later, I was the proud owner of this jacket:

$6 men's jacket from the Salvation Army

Part 3: The Sleeveless Tuxedo Dress:  Remove sleeves and sew extra material into inside of jacket and voila!  A sleeveless tuxedo dress!  I paired it with a Zara ruched sleeved top for work and added a Victoria’s Secret lace slip (which I scored for $4 at their recent Semi-Annual Sale) underneath to add length, but otherwise, also great to wear alone with a pair of shooties, like the ones I’m wearing here from Ann Taylor!

pic front pic side clear

Intermix vs Thrifted DIY

So, what do you think??  Let me know if you would like me provide specific details about the repurposing process and I’ll post a tutorial!

Otherwise, take a look at what Natasha found and did with her thifted item this week!  I love how she repurposed her skirt to make it into a more youthful-looking skirt!

Midi skirt to above the knee full skirt!Doesn’t she just look darling?!  A full-lenth midi skirt hemmed to show off her fabulous gams.  Love!  Read more about her process on Baby T’s Fashion Diaries!

Finally, let me know if you’re enjoying these thrifting posts in the comments section below.  Maybe this thrifting thing can be a weekly thing from now on. 🙂

Until next time!  Stay Chic!!

Geek Chic DIY – The Chanel USB

Hello, Friends!

I’ve been a little busy these past few weeks, but FINALLY had the time to finish a couple of blog posts.  They will be published sporadically these next couple of weeks, but I HAD to start with my very first, ‘Chic in Academia, DIY’!!  Oh, for those of you who are not acronym-inclined, DIY stands for do-it-yourself. 😉

So, this is how the story goes: A while back – I’m talking maybe 6 months ago – Nina Garcia (Creative Director of Marie Claire Magazine, but better known for her role as judge on the Emmy winning show, Project Runway), posted a picture of a Chanel USB on Instagram.  It got a ton of likes…like THOUSANDS!!  And I completely understood why!  I TOO wanted this Chanel USB drive. Sigh.  What DON’T I want???  Haha!  So I took to cyberspace and searched and searched, only to find that ONE – yes, a single one – shop on Etsy sold this USB drive.  And guess what?  It was selling for $90!!!!  That’s a large chunk of change for a USB drive!

Chic in Academia, http://chicinacademia.com

USB drive posted on Nina Garcia’s Instagram account

Anyhow, it occurred to me that perhaps this was something I could make.  I remembered there was a Chanel lipstick that I purchased a while back and had never used (the color was just not right), as well as a USB drive that was currently housed in a cover that had since tarnished (it was one of those engraveable ones).  I took some nontraditional tools (just wait, you’ll see) and got to it!  10-15 minutes later, I had my very own Chanel USB drive!  Now – thanks to me – you can too!

Here’s what you will need:

  • a knife, mine was plastic (disposable, and um, yes, recyclable!)
  • paper towel
  • plastic sandwich bag
  • sharp, smallish scissors (or in my case cuticle nippers)
  • a Chanel lipstick tube
  • a Scan disk USB drive

This slideshow requires JavaScript.

Step 1: Prepare lipstick tube.  Take cap off and expose entire length of lipstick.  Use the plastic knife to cut at the base of the tube.  You’ll only be able to cut at the top of the clear plastic, but you’ll use the knife to scoop out the rest of it.

This slideshow requires JavaScript.

Step 2: Prepare to remove the gold cylinder from the lipstick holder.  First, use a plastic sandwich bag to store all of the lipstick remains.  The last thing you want is to have lipstick all over you and or your workspace!  Next, remove the white casing from the lipstick tube with the cuticle nippers.  Why the nippers??  Well, they were the only scissor-type tool that was small and narrow enough to fit in the tube.  Also, you are trying to get between the gold cylinder and the white casing so as to loosen the white casing enough that it comes loose.  The nippers have the perfect edge for this. As you remove the white casing, the clear plastic part and the gold cylinder will come loose.  Set them aside.  Remove all of the white casing until you’ve gotten to the bottom of the lipstick holder.

This slideshow requires JavaScript.

Step 3: You should now have an empty plastic lipstick part (smallest part in picture on left below), a gold cylinder, the bottom part of the lipstick, the lipstick cover, and your USB drive.  Toss the clear plastic lipstick part; you don’t need this anymore.  Take your USB drive and slide it into the gold cylinder.  It should fit perfectly.

This slideshow requires JavaScript.

Step 4: Take the gold cylinder with your USB drive inside and slide into the bottom of the lipstick cover.  This too should slide all the way to the bottom of the lipstick holder.  Once you’ve done that, you’re done!  Ta da!  You have your very own Chanel lipstick USB drive!!

Chic in Academia, http://chicinacademia.com

Yes, that is print that you see on the paper I used for a backdrop. I was recycling! 🙂

Super easy, right?!!  I know, there’s no reason why it should have taken me six long months to tell you about this, but better late than never, I say!

So, my chic academics (and other geek chic fashionistas), now you too can house your USB drive in a pretty lipstick tube, as opposed to the often boring and lackluster cases that regular USB drives come in. 🙂  Also, you can use other tubes of lipstick, so you are not limited to Chanel.  Although, who wouldn’t want to have Chanel??? 😉

If you’ve made it this far, THANK YOU!  I’m super nervous about this first DIY, but hope that I will get better as I write more of these.  Take a minute to let me know what you thought in the comments section.  Otherwise, stay tuned for a fun post about dressing for academia (and other professional work environments) by thrifting!!

Until then, follow my daily outfit styling posts on Instagram and Twitter!

Stay chic!