Mixed Prints

It’s not uncommon for me to try something new.  After all, what is fashion about if not to try new things!  Today, I tried mixing a bold graphic print with a horizontal, black and white pencil skirt.  When mixing prints, black and white is a pretty easy palette to work with.  Here are the two items I decided to pair together:

Chic in Academia, http://chicinacademia.com

Asos Monkey Print Dress, $18.34, asos.com

Chic in Academia, http://chicinacademia.com

Women’s Striped Ponte Pencil Skirt, $22.99, target.com

I tucked the dress under a pencil skirt (I also wore the dress backwards!), threw a statement belt and blazer over it and finished the look off with some red pumps.

Chic in Academia, http://chicinacademia.com

Chic in Academia, http://chicinacademia.com

Chic in Academia, http://chicinacademia.com

Chic in Academia, http://chicinacademia.com

Other outfit details: Earrings, Lisi Lerch // Blazer, Zara, similar here // Belt, Lotus Boutique, similar here // Sunglasses, Emblem Eyewear

Some photos shot by Styled by Ale and others by Chic in Academia.

What do you think??  Did I print-mix successfully?!  Be sure to leave me a comment below to let me know what you thought.  Also, follow me on Instagram to find out where I wore this outfit today!

Until next time! Stay ‘Chic’!

The best peanut butter banana bread recipe

I am by no means a culinary expert of any sort.  In fact, my husband likes to tell people that when he first met me, I once burned water.  Yep.  That was me.  I was so enamored by my then to-be hubbles, that I completely forgot I was boiling water and it completely evaporated.  But that’s old news and I’ve come a long way since, haha.  At least I like to think so. 😉

Anyhow, I was working late last night and knew I would need a snack.  We had some very ripe bananas, so I decided to make some banana bread.  I have a super old recipe book (okay, it’s about 10 years old now so not SUPER old), and in it, is a banana bread recipe that I have made over and over again over the years.  Hubby loves it and now, so do the boys!  Anyhow, I posted a picture of the freshly baked loaf on Instagram last night and got some requests for the recipe, so here it is!

Peanut Butter Banana Bread Recipe, Chic in Academia, http://chicinacademia.com

The recipe comes from the cookbook ‘A Taste of Home.  I took elements of the recipe and to make my own version of The BEST Peanut Butter Banana Bread. 🙂

Ingredients:

  • 1/4 cup butter, softened
  • 3/4 cup sugar
  • 2 eggs
  • 3 small bananas (SUPER ripe…as in, the outside is nearly completely brown)
  • 1/2 cup sour cream
  • 2 1/4 cups all-purpose flour
  • 1 teaspoon ground cinnamon
  • 3/4 teaspoon baking soda
  • 1/2 teaspoon salt
  • 1/2 cup smooth peanut butter (add 3/4 cup for a stronger peanut butter taste)

*add 1/2 cup canola oil if you want to increase bread moisture.  Also, pictured – but not used – is the vanilla extract.  Add 1 teaspoon for sweeter taste.  Finally, you can also add in 1 cup of semi-sweet chocolate chips for added amazingness. Yum!

Directions:

  1. In a large mixing bowl, mix butter and sugar until light and fluffy.  Add eggs, one at a time, mixing after each one.
  2. Stir in bananas and sour cream.  Combine flour, cinnamon, salt, and peanut butter.
  3. Transfer to greased pan (I used a 8″x4″x2″ loaf pan).  Bake at 350 degrees for 1 hour or until toothpick inserted in the center of the loaf comes out clean.  Cool in pan for about 10 minutes before transferring to rack to cool.

Peanut Butter Banana Bread, http://chicinacademia.com

Peanut Butter Banana Bread, http://chicinacademia.com

I’ve also read that some people use 1 cup and 1 teaspoon buttermilk instead of the sour cream.  Perhaps I’ll try that next time and let you know how it turns out!  For now, I hope you enjoy this version of the recipe.  Let me know if you make it and what you think of this version of peanut butter banana bread.  I’d love to hear from you!  Have a great rest of your week!

Until next time! Stay ‘Chic’!

Hermes Tray DIY

If you follow me on Instagram, you know that I’ve undertaken an office-makeover project at work.  I’ve posted a couple of updates so far, but today got lots of questions about one of the items in my post: an Hermès tray!

Hermes Tray Vintage, http://chicinacademia.comVintage Hermes Tray, 1stdibs.com (Photo: 1stdibs)

The one pictured above is a vintage tray that sells for $875.  If you’ve read my blog once or twice, you know that I’m not one to pay retail, but that instead, I’m one to seek luxe for less.  Well, that’s exactly what I did…again!

I’d known for some time that I wanted one, so I searched Pinterest for possible places to purchase one that wasn’t going to cost me an arm and a leg.  Pinterest is a great place to seek inspiration.  If you’re not a big ‘pinner’ feel free to peruse my boards from time to time!  Anyway, after searching Pinterest a few times, I did find some replicas or ‘inspired’ trays that were reasonably priced; but as I am decorating this office on a budget, I really wanted to pay less than $50 for mine. Here are a couple of ones I found, both which are priced $125 or less:

Hermes Tray Replica // http://chicinacademia.comHermès Tray Replica, Artfire.com, $99.00 (Photo: Artfire)

Hermes Tray Replica Etsy, http://chicinacademia.com
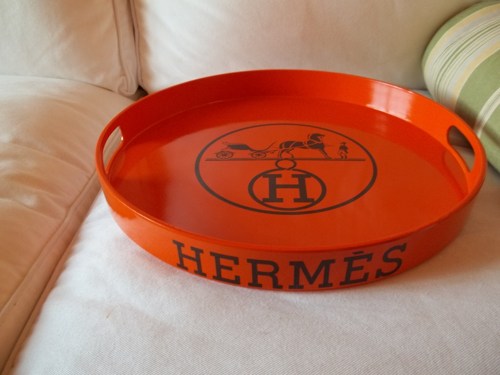
Hermès Tray Replica, Etsy.com, $125 (Photo: Etsy Seller)

I still felt like $100 was too much for a replica.  So, I searched for just a simple tray instead.  That’s when I found this one I decided for in the end on eBay!

Orange Lacquer Tray eBay Timeless Settings, http://chicinacademia.comOrange Lacquer Tray, eBay, $20 (Photo: Timeless Settings)

I like that it has the mirrored bottom, and also loved the price!  You can find this one on eBay from seller Timeless-Settings for a mere $20!  Score!  There is also a round one you can buy for $52 dollars, but again, that starts to get a bit out of my price range, so I stuck with the $20 tray.  You can find the round one, here.

Honestly, initially, I didn’t have plans to make my own Hermès DIY tray; but, then, I happened to come across this decal while shopping for decals for my office wall and decided I’d give it a try!

Hermes Logo Trading Phrases, http://chicinacademia.comHermès Wall Decal, Trading Phrases, $14.99 (Photo: Trading Phrases)

They have several sizes, but happen to have a decal that measures 5.5″ x 1″.  The size is perfect for the side of the tray I found on eBay!!  I ordered both and one week later, I had my own Hermès replica tray for about $35!  Here’s a sneak peak of the tray:

Tray without logo, http://chicinacademia.comTray without logo (Photo: Chic In Academia)

Tray without logo, http://chicinacademia.comTray without logo, another view (Photo: Chic in Academia)

Tray with Logo on Bar Cart, http://chicinacademia.com
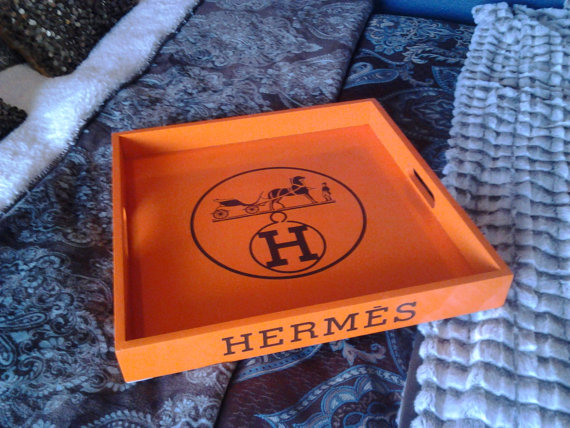
Tray with logo.  DIY Success!! (Photo: Chic in Academia)

What do you think?!  I’m personally pretty excited about the way it turned out!  I’m not quite done decorating and this bar cart is not quite styled the way I want it yet, so stay tuned for an update on the make over and all the final details.  In the meantime, I wanted to share this with you before the trays sell out!  Keep up with my updates on Instagram, Twitter and Pinterest.  I’d  also love to hear what you think about the DIY or what you think of the bar styling so far, so leave a comment below!  I hope you all have a fantastic weekend and I can’t wait to hear from you!

Until next time!  Stay chic!