About a month ago, my dear friend (also super sweet and so gorgeous) Amy from My Soapbox Moment, and I decided to take on a thifting challenge. We agreed to spend $20 on a thrifted outfit, including shoes.
At first, I thought, oh sure, $20 dollars, no problem. Then I got to the store and realized, this challenge was going to be more difficult than I thought! That is, until I really started to actively look through the racks of clothing at the store. Then, I had more clothes than I knew what to do with, haha!
I’ll tell you what prompted me to even consider this challenge. A while back I heard a story on NPR (I wish I could remember the name of the segment…), where they mentioned that the average person in Alabama only has about $7 a month to spend on clothing. $7 a month! That’s nothing!! So it made me think about the young woman going in for her first job interview, or perhaps the one that landed her first job out of college and needs an office-appropriate look for her first day of work. Or maybe the graduate student going to her very first scientific conference. What can she afford to buy?
So off to Salvation Army I went. With this young woman in mind. And I was faced with racks and racks of clothing. SO many clothes! It can be a little overwhelming for the novice shopper, but not me! I’m a pro. 😉
 Here’s how I approach racks. Usually, they are categorized either by color (as in picture above) or type of garment. So, I actively search the racks for colors or fabrics that stand out and catch my eye. Take a look at this rack, for example:
 Of course it depends on what colors and prints you tend to wear, but in my case, I was immediately drawn to the cobalt blue top. The color is very on trend and the fabric doesn’t look wrinkled, which likely means that it won’t wrinkle at home either. By the way, this top came home with me. I’ll be styling this top on Instagram in the coming week!
After looking through multiple racks – okay ALL of the racks – I found two outfits, which I envisioned this girl wearing to work/conference during the day, then to happy hour with her girlfriends to celebrate her first day on the job or a successful poster presentation! Take a look at what I put together for the ‘day look’:

 An orange and black number for my day look. I thought the top was feminine, conservative, and office appropriate. I went with a basic, black pencil skirt that she could wear over and over with different types of tops. Finally, because it is summer, a pair of peep-toe heels. In retrospect, I could have done without the belt…but, the young woman I have in mind is a ‘chic’ academic, a ‘chic’ professional, so a chic belt it is! The bag (a Phillip Lim for Target) was also not included in the budget, but it’s currently my go-to work bag. Why? Basically, my MacBook Pro fits in it, so it’s the perfect bag for work!
Here’s the price breakdown:
- Chico’s Black Label top, $3
- New York and Company pencil skirt, $2.50
- Anne Michele Peep Toe Heels, $4
Total cost for this outfit: $9.50 (sans accessories)
Okay, so a little more than $7, but maybe she can borrow $2.50 from her girlfriend, right?!
For the ‘happy-hour-after-work look’, I wanted to be able to stay within the $20 proposed spending limit, which meant, I only had another $10.50 left to spend. So, I purchased the Bisou Bisou top you see below, which is super versatile. It is another very on trend piece, reminiscent of Mara Hoffman or Clover Canyon, in my opinion. Take a look and tell me what you think:

 Here’s the price breakdown:
- Bisou Bisou top, $5
- Same New York & Co skirt from previous outfit, $2.50
- Same Anne Michele shoes from previous outfit, $4
Total cost for this outfit: $11.50 (but only $5 additional dollars from the $9.50 spent for the previous outfit and also not including accessories)
In all, I spent $14.50 and had two outfits to wear! With the $5.50 left, I could certainly have searched for some accessories, but unfortunately the ones available that day did not strike my fancy. 😀
The most difficult part was finding shoes that fit in my budget. These shoes were actually tagged new, so I went with these shoes as opposed to a black-goes-with-everything pair of used shoes. The orange tone was somewhat limiting, but I wanted to buy something that was going to last, that I would actually wear again, and that would work beyond the scope of this blog post. So, orange it was and I chose clothing items accordingly. 😉
The shoes were originally $8, but on Thursdays at the Salvation Army, certain colored tags get discounted a certain percentage. I didn’t know this when I arrived, but happened to chat with the security guard standing by the door, who spilled the beans! Here’s what he had to say:
- At least at the Hoover, AL store, Thursdays are the BEE-NEEZ. That’s the day to shop because some of the items in the store receive an additional discount. The discount varies from week to week
- There’s no sales tax on items purchased at the Salvation Army. I DID NOT KNOW THAT! Did you?! And some items are new! Totally worth revisiting your opinion of thrift stores, if you had a bad one to begin with. Don’t you think?
- If at first you don’t succeed in finding what you’re looking for, try asking the sales associates. They know the stores like the back of their hand and can almost always help you find what you had in mind.
The day I went, it so happened that the purple tags had an additional 50% discount. So, the shoes, the skirt and the orange button down top were all 1/2 off! The multi-colored Bisou Bisou top was originally priced $5, and didn’t have any additional discounts. Do be very careful and inspect all garments and or shoes before purchasing. Remember, these items are all donated…often because they have a defect of some sort. Keep these tips in mind when considering thrifted clothing:
- Inspect for holes, tears, snags, etc.
- Smell the garment. If it smells moldy, reeks of perfume/cologne, etc…you should prob stay away from it.
- Take a look at where the tag has been placed. At the Salvation Army, all price tags are stapled on to the clothes. If the item is silk, or some other delicate fabric and the staples are placed somewhere other than the tag, chances are, you will have holes in your new thrifted item when you get home and remove the tag. No bueno!
- Finally, go for fit versus brand when selecting items. Sometimes, you’ll find gems in garments with no tags, unknown brands, or simply items that might be considered vintage. No one is going to pay attention to the tag that sits INSIDE the clothes you are wearing. They will, however, see if the fit is amazing, or if it makes you look like a frumpy grump. 😉
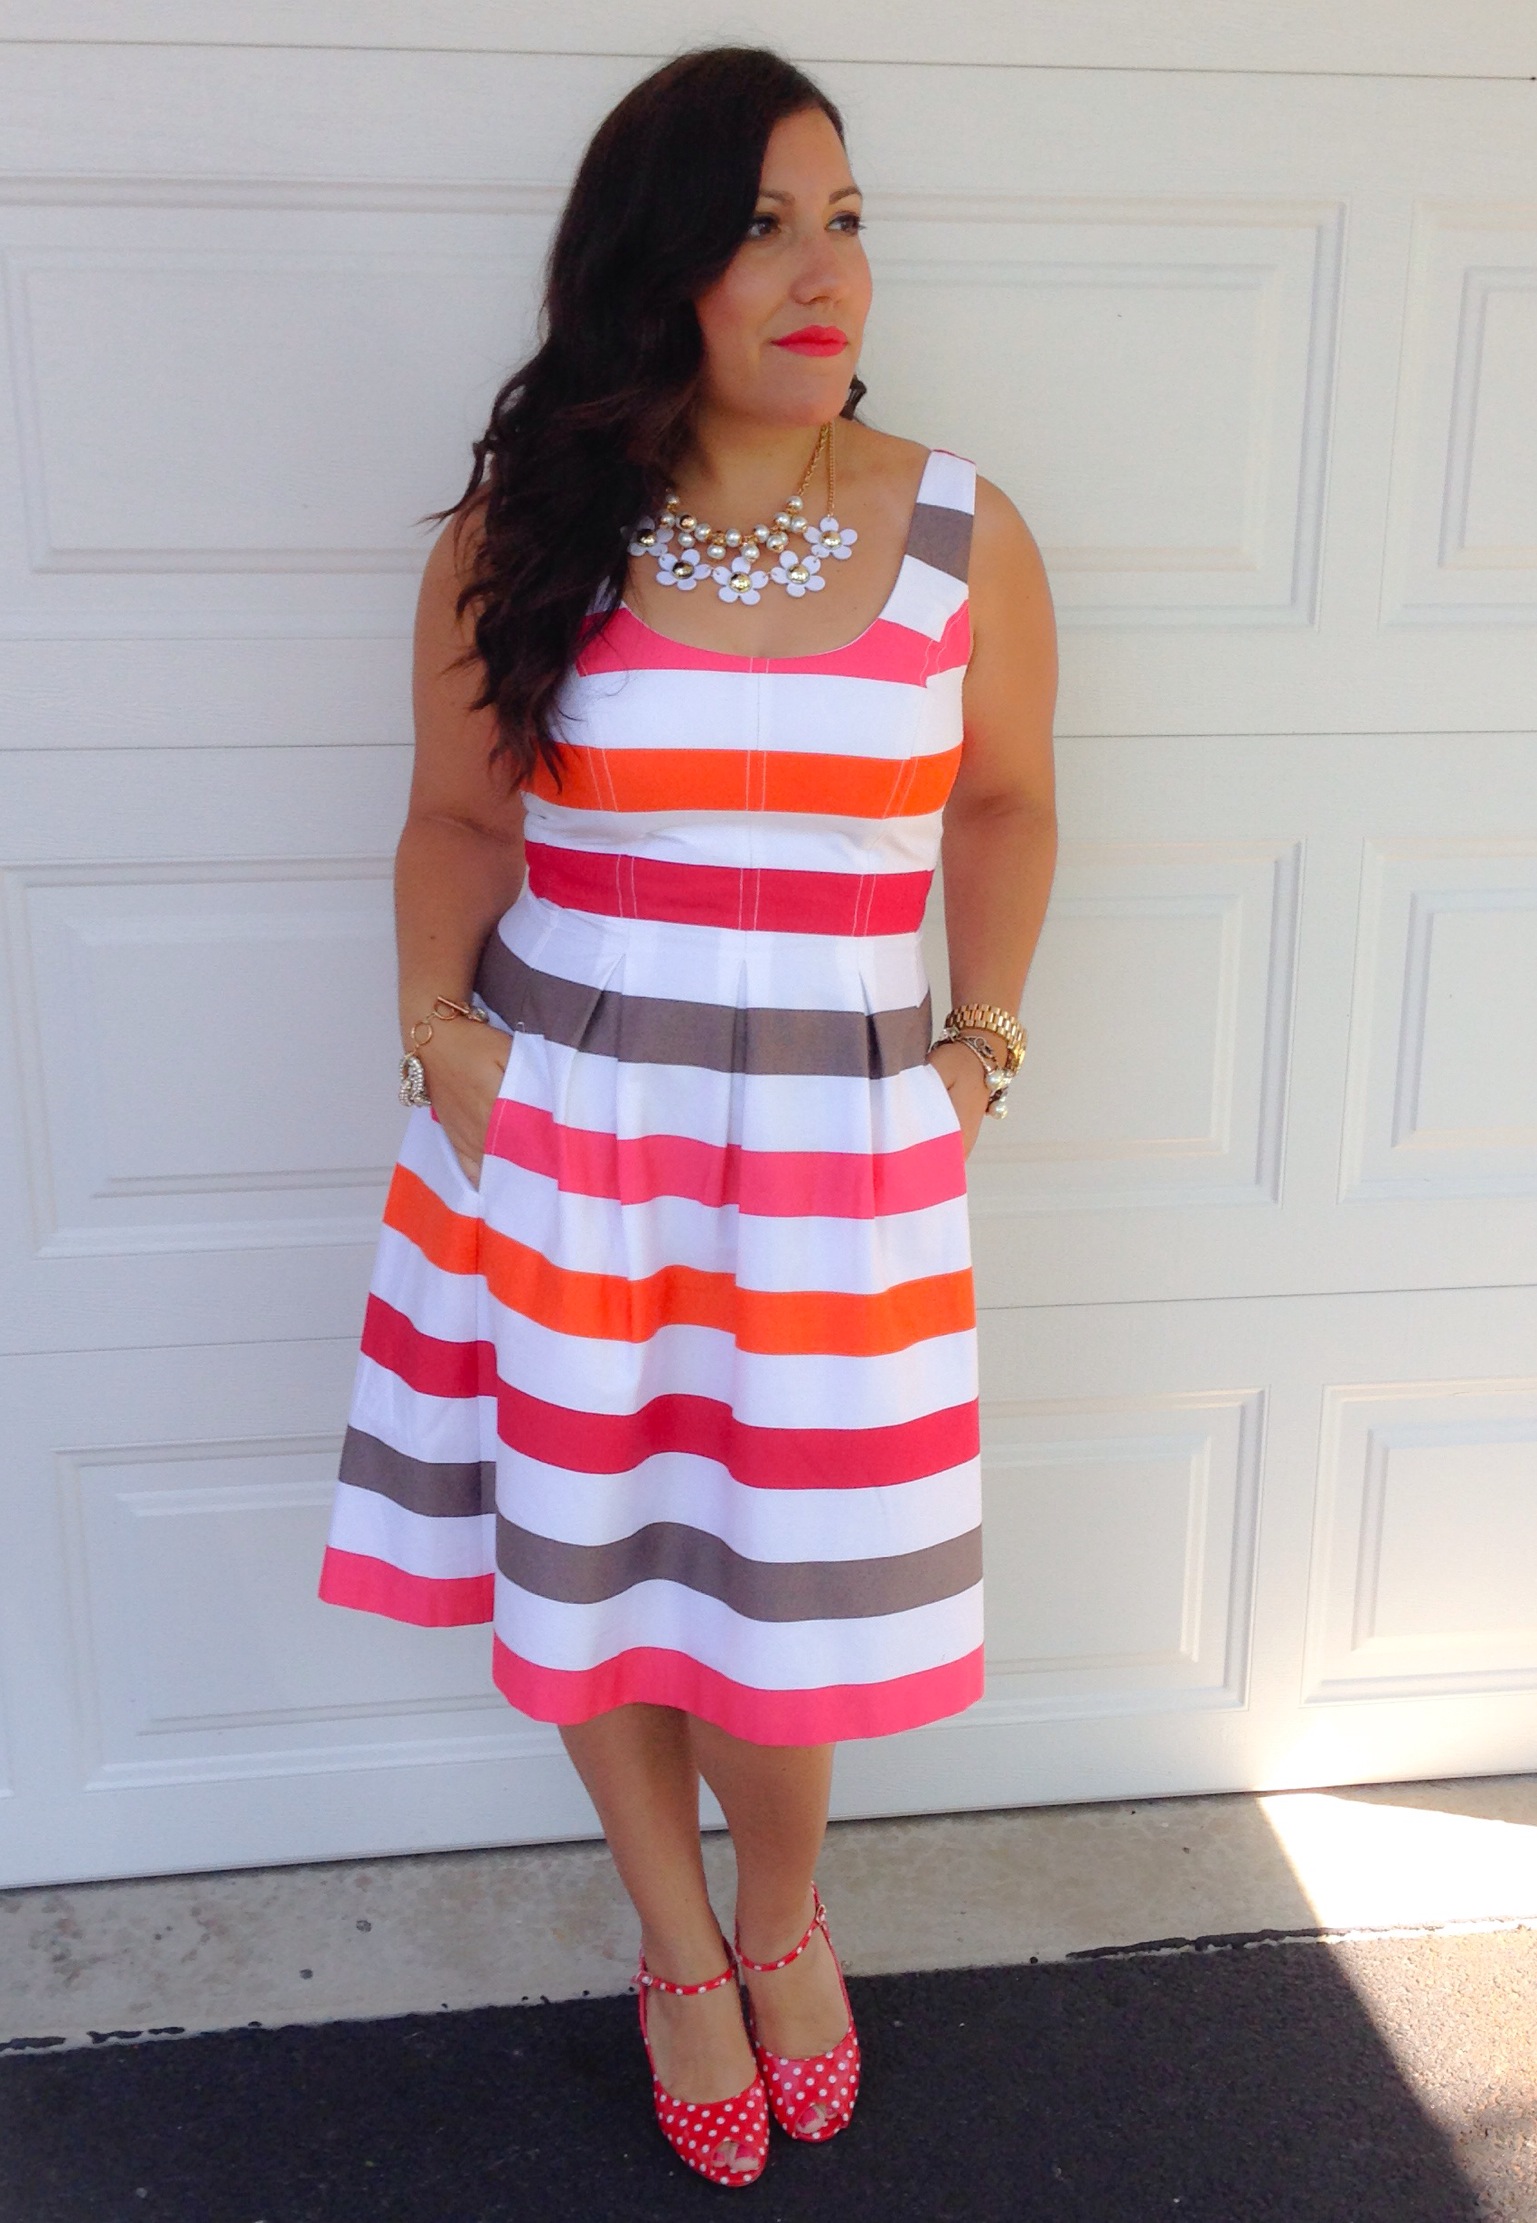
So, last night, Amy and I compared notes! And guess what, she found some fab outfits as well!! Visit her blog for details on what she paid for each item, but generally, I’ll tell you that she spent about $15 for her day look (vintage, thrifted necklace included), which is so FAB by the way:
 and about $14 for her evening look (accessories not included, but were purchased at a significant discounted price!):
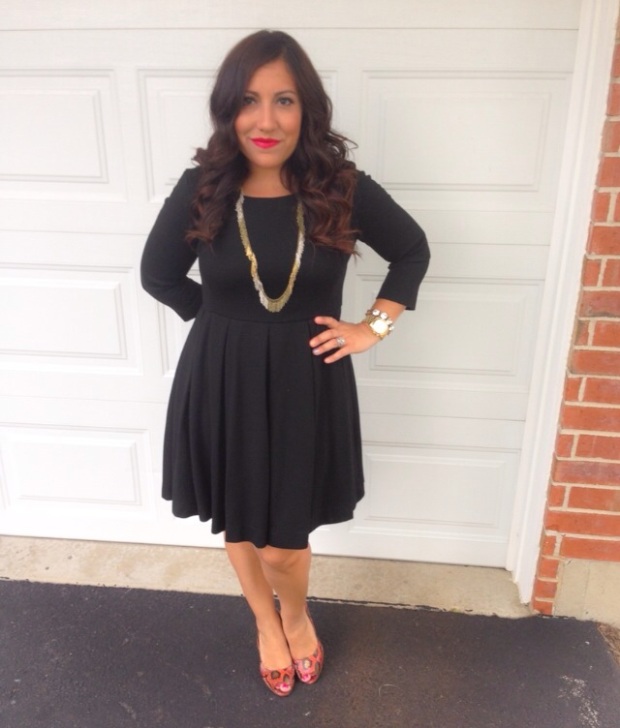
 Didn’t she do an amazing job? I LOVE the color of the evening dress…perfect for a dinner with the hubs, al fresco! And the polka dot shoes, with the striped dress…LOVE! Great pattern mixing. I’m also in love with the day look…every girl needs a little black dress. Amy is the sweetest woman I know on Instagram! So full of energy, love, and happiness. It shows through in every picture she posts. Make sure to follow her on Instagram to keep up with more of her fabulousness!
So, how do you think we did??! Comment below or feel free to head over to my Instagram or Twitter and leave comments there!
Until next time, friends, stay chic!
PS – A special thank you to my hubby hubs for taking my pictures for this post! Love ya, hubby!
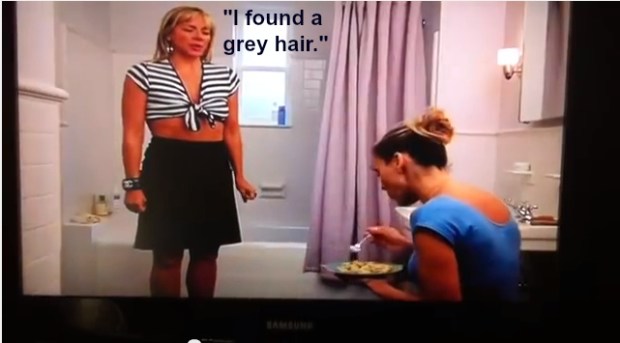

 I realize that it’s probably not long before I’ll have to start dying my hair – if I choose to dye it at all – but for now, I’ll stick to these temporary fixes. I’d love to hear about what tactics you use to hide your greys. Please share them with me!! Nobody seems to talk about this stuff, so someone like me is faced with fear and shock and denial and incompetence! Help a sister out for goodness sake! Share your secrets!! Seriously though, in light of the fact that I am now a grey-concealing ninja, I also contemplated putting together a video to show you how I use these products. Leave me a comment below if you think you might be interested in that at all.